Monday, May 18, 2015

5/17/15 - 30 Weeks & 7790 Frames Later...

My film is complete!

It's been a long, arduous road, and there have been several instances where I thought this film wasn't going to make it, but it's done, and I'm super proud of it.

Here's the vimeo link: https://vimeo.com/128090406 (pw: nitnoi)

Time to pass OUT.


Friday, April 10, 2015

4/09/15 - And a Month and a Half Later...

I swear I didn't forget about this blog. I've just been busy staring at Maya for the past 7 weeks and splining animation keys left and right. I just get so distracted from all the fun I'm having that I can't find any time to post a worthwhile update.

HOWEVER —

Now I know I said I wasn't going to post any animation on here until I was done, but I figured I'd go back on my word and post my current playblasted rough cut. I have about a third of the film left to fully animate and I still need to fine tune a couple of shots, but it's a lot of progress from the last post so I'm pretty proud of myself.


The water effects haven't been included yet since my technical person is currently working on that and I still have 2D effects to draw out. Sound is in progress and I'm especially excited with my composer's work so far (which isn't in this version of the rough cut but I can assure you it's pretty quality stuff).

Anyways it's currently week 10 and my thesis advisor keeps reassuring me that I'm at a decent place in terms of my timeline, but I'm not sure whether or not she's lying to me to keep me motivated. Regardless I feel a lot less behind compared to two months ago and I might even start seeing the light at the end of the tunnel pretty soon. WEEK 15 HERE I COME.

Tuesday, February 24, 2015

2/23/15 - Finalizing the Look

Ok so you know how last blog post I promised I'd have animation up in this one? Good news is that I do have animation, bad news is that I've decided not to put any of it up to build suspense and excitement for the final product (I SWEAR I HAVE STUFF ANIMATED THO).

HOWEVER, in order to make up for broken promises I present to you screenshots of my final (for the most part) character textures. This is without any shadow/AO passes and possibly also specular.


That's all I have for this post — next one will probably be text updates since I want to keep the rest of the film under wraps as much as possible. 

Although here's a small look on how progress is going:


Wednesday, January 28, 2015

1/28/15 - Back on the Strugglebus™

It's been about two and a half weeks since my last entry, and I'm proud to say that I finally have a completed forest! It turned out better than I imagined, especially since organic environments are my biggest modeling pothole (with character faces coming in at a close second). Although at this point if I have to paint another tree I might just spontaneously combust.

Here's what I have so far with the forest (this is of course before fancy color correction and post-effects)


The stream-bed is still dry because water hasn't been composited onto it yet (that's my technical director's job).

And here's the overall setup:


I think with how my shots are framed you won't get to see much of the higher foliage/mountains/sky, which is too bad because I spent a good chunk of time painting all of that. :( I also ended up cutting corners with the extra shrubbery by texturing them the same way I did for my previous film: create plane -> subdivide -> 'puff' out flat geometry using soft select -> slap on a flat painting of fauna -> adjust to give illusion of 3D or make duplicates to create more volume. It's a fast formula that works every time.

So with about 95% of my texturing and modeling out of the way I can finally concentrate solely on animation, which I swear I've been doing. I have to get at least 50% of my animation done in 4 weeks for my thesis rough cut so in my next blog post I promise I'll show some characters actually moving.

Lord give me strength.

Saturday, January 10, 2015

1/10/15 - More Textures!

This is sort of a continuation of the last post, but this time I actually have environment textures to show. There's a minor texture issue with some of the hut objects, but I'm working on fixing those, promise.


And here's the setup:


It looks pretty bland, I know, but I plan on adding an AO and shadow pass to give everything more depth. Color correction/artificial lighting will also happen once this gets into post. But yeah, for the most part this is the style I'm going for with my textures and I'm pretty dead-set on it. Character textures, however, are still a work in progress because surface shaders aren't as kind to them as they are to my environment.

My goals for my last two weeks of winter break involve getting the forest environment setup, finalize character textures, get more animation done, and finish up the rest of my texturing/assets. Mainly the animation part though because good lord I am so behind.

Saturday, January 3, 2015

1/02/15 - New Year, Same Grind

First of all, I believe it's common courtesy to wish others a Happy New Years, so to those who actually bother to peruse the contents of my thesis blog, Happy New Years (at this point it should be 2015 for everyone around the world)!

I apologize for the lack of blog posts during the past two months, but rest assured, work is definitely being done. However this post is mainly going to focus on showing off my textures since animation is still in the works at the moment and doesn't deserve blog-worthy screen-time yet (or long story short: painting skin-weights suck and animation is delayed because of it).

But I digress.

Now with my textures I initially went with my traditional method of shadering (not an actual term), which simply involved creating a plain lambert and slapping on an image file of my painted texture. However, the main problem with this was that I had to be very picky about my lights and I'd have to constantly adjust them to work with the entire scene as a whole. Lighting a single object is one thing, but having to make those lights work with several other objects is a monster to handle (and it's far beyond my skill level at the moment). So initially using my tried and true method my krathong looked like this:


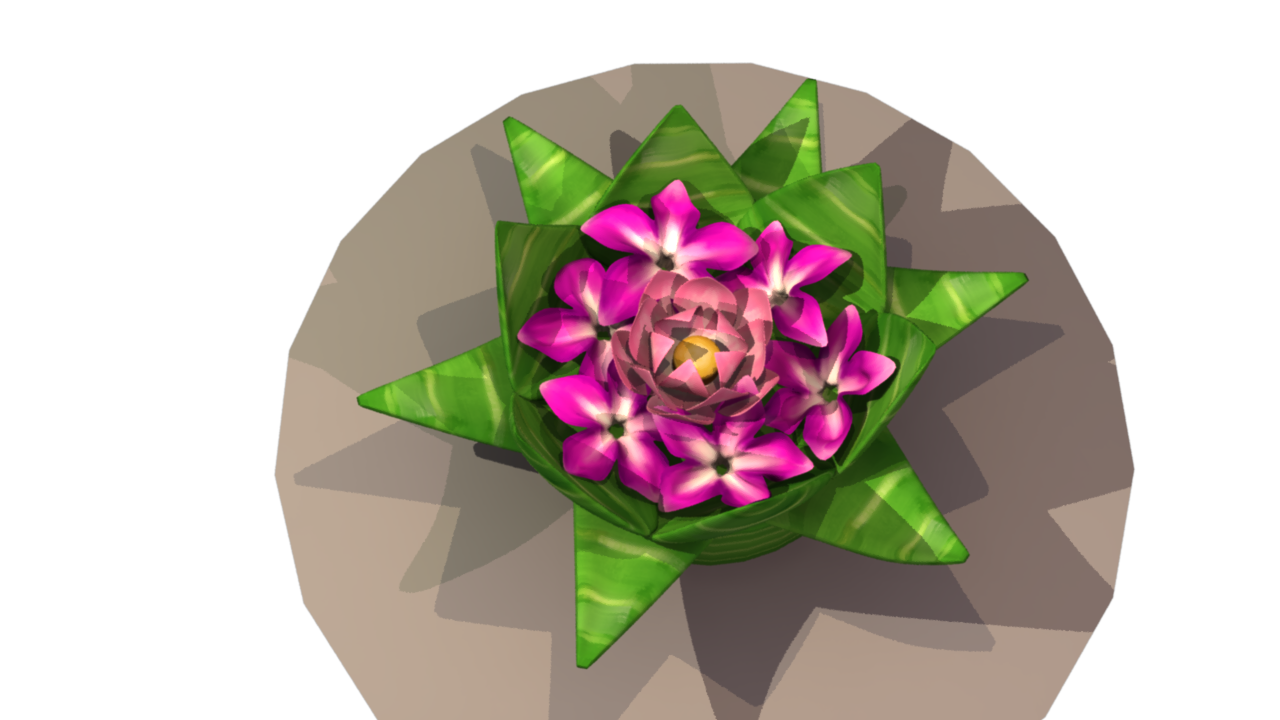
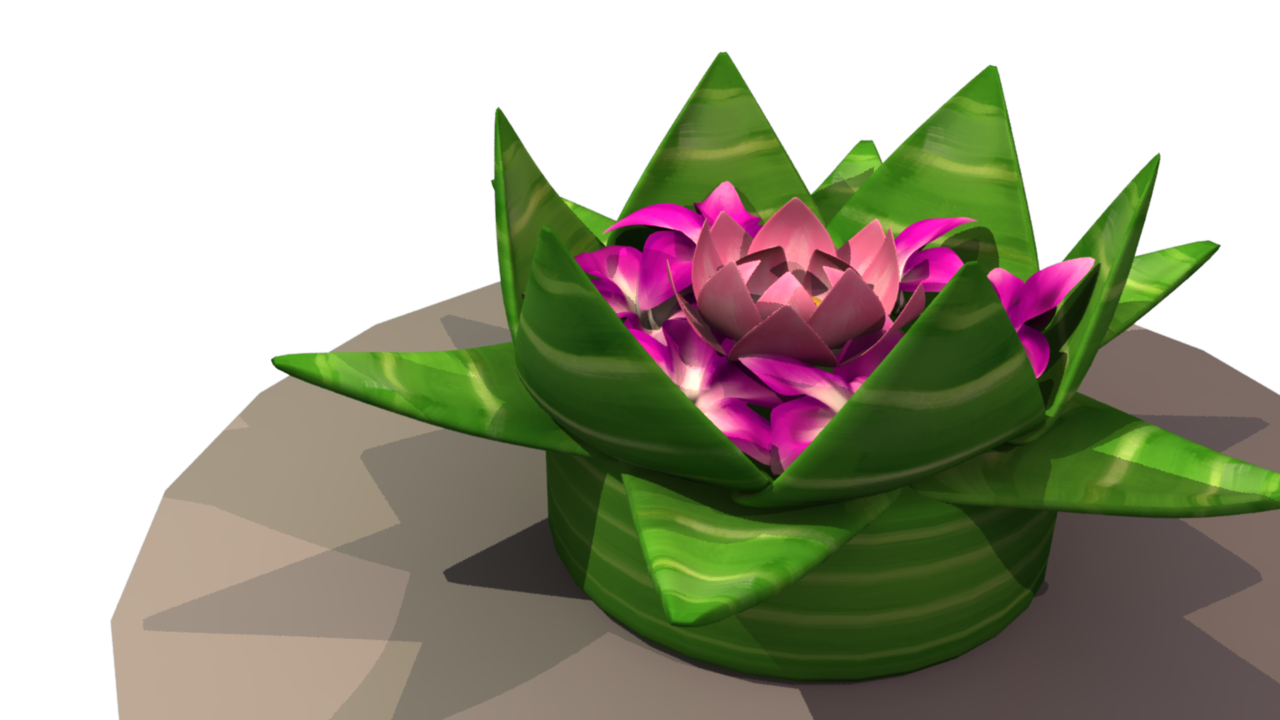
It honestly doesn't look that bad, but this involved 3 carefully positioned lights set at various intensities and colors. Now imagine having to use those same 3 lights for the rest of my objects and environments — even if there was a way to keep lights linked to certain objects (which I'm sure there is), I'm not ready to kill my computer with over 10 lights in my scene. Also as pretty as this look was it wasn't the 2D/flat 3D look I wanted to shoot for so I had to go back to the drawing table and start researching for an alternative shader solution.

Several days of researching and enlightening talk with my advisor led me to a very simple solution: surface shaders. In hindsight I really should've explored this shader more but I was too comfortable with my blinns and lamberts to step out of my texturing comfort zones. The surface shader made it so I could attach my painted textures without having to worry about lighting my object, and also maintains a fairly flat look since it's unaffected by light or shadow. Of course this is also a con since I don't want my film to look completely flat, but I came up with a solution to solve the flatness simply by creating an AO pass and a shadow transparency pass and overlaying them on top of the surface shader.

(left is plain surface shader with my texture, right is surface shader with AO pass on 50% multiply)


As you can see in right image the object kind of mimics the properties of a lambert, but the look is a lot flatter and closer to what I'm aiming for in my film. Even though I removed 3D lights from my textures I can still adjust color and add artificial lighting to my objects and scenes through after effects in post. It's a win/win.
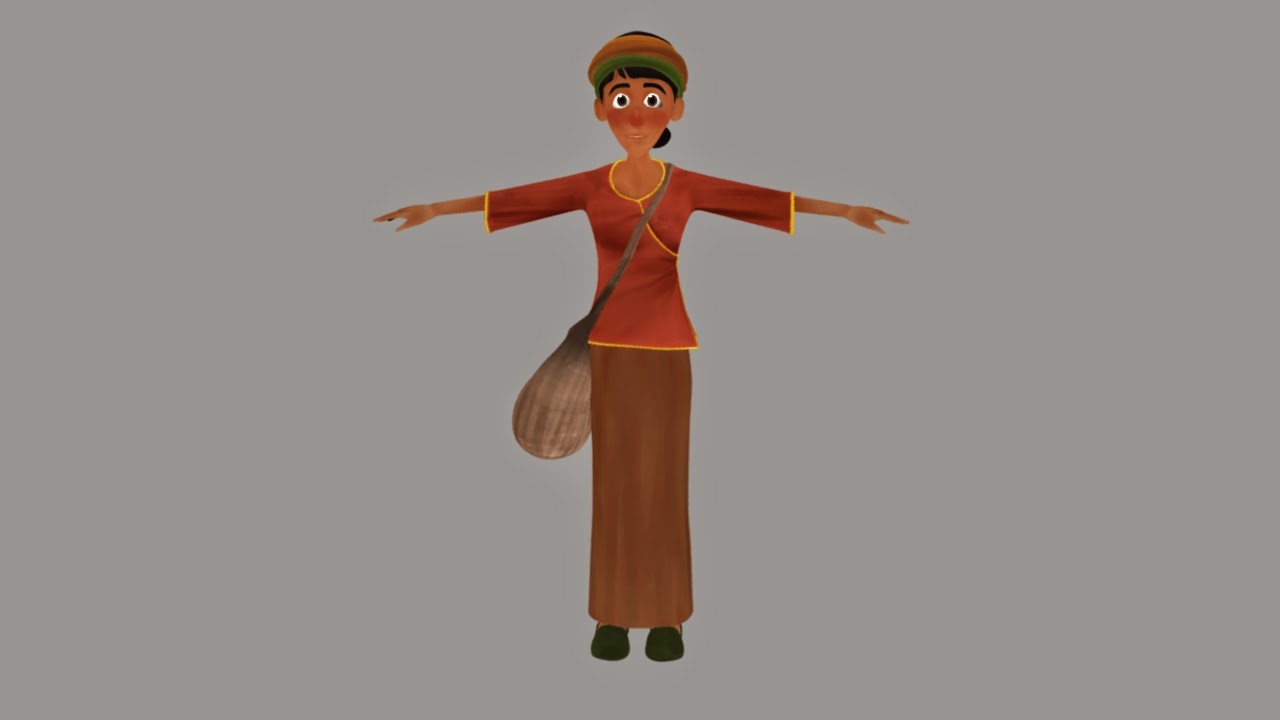
Now as far as my character textures go, zbrush has been temperamental with me and refuses to export my textures so I've been trying to do a workaround in photoshop. The only downside is that I can't directly color on my model so I have to trust my UV mapping and hopefully produce something close to what I had in zbrush. Unlike my environmental assets I plan on directly baking AO into my character textures since the flatness is way too pronounced on the surface shader (and not being able to directly paint depth onto my characters sucks because zbrush is finnicky).

There you have it, PROGRESS. There's other behind-the-scenes stuff that I did but I'd rather lump it in the next blog post when I finally get to show some animation.

Tuesday, November 4, 2014

11/04/14 - No-Sleep November

The title is not an exaggeration.

In order to catch up to my ever-backed-up schedule I've been working nearly nonstop on polishing my models for rigging and revising my 3D animatic (YEAH YOU HEARD ME) to nail my shots and timing. The latter is still a bit shaky due to quality of my blocking but the total time is officially climbing to 4 minutes and this concerns me a bit. Well, maybe not too much. My last film was about 3 1/2 minutes total with credits and as long as my thesis doesn't go past the 10 minute mark (so lord help me) I should remain sane for the rest of the semester. ANYWAYS point is I'm still behind on schedule, BUT not enough to warrant irrational week 11 stress/panic. That's saved for the spring semester.

NOW FOR SOME GOOD NEWS

I have a lot of stuff to show off in this post, starting with the third revised version of my 3D animatic. Buckle your metaphorical seatbelts and enjoy the ride because it's quite the quality work.


And here are the polished character models (texture/normal maps will come later). Blendshapes and rigging will begin very soon (still need to figure how I'm gonna animate clothes). Otherwise they're all in one piece and fully UV unwrapped (3DUnfold was a great improvement to maya 2015 and I daresay the only improvement worth upgrading for).


But wait, there's MORE. Have an almost completed hut set with some decorations.


I'm not an architect nor do I have an eye for interior design but I'm very proud of what I have so far. I still need to add in some empty pots and bowls and maybe a wall deco or two, but this is pretty much a nearly complete set. Don't be fooled by how plain it looks, though — a good chunk of its aesthetic will come from the texturing. I ain't modeling thatch and bamboo patterns.

I was supposed to get the krathong prop done too but I was more focused on finishing up my characters and making my hut look habitable so I kind of neglected the most important asset of my film (sry). HOWEVER I WILL DEF GET ON TOP OF THAT SOON. By soon I mean this week. Definitely this week. 

Lastly on a very related note, Loi Krathong (the actual festival) is celebrated this month and my mom made her own krathong to float at the local festival which I thought was hella cool so here are some pictures I stole from her facebook.


ONWARD TO WEEK 12 AND THE BEGINNING OF STRESS TEARS!